• How I Made My Kitchen Look Expensive (Without Paying for Hardwired Lighting)
    Warm under-counter lighting enhances kitchen style without breaking the bank
    Warm under-cabinet lighting enhances kitchen style without breaking the bank.

    Why I Chose Rechargeable Under Cabinet Lights Instead of Hardwired Options

    Okay, let’s talk kitchen lighting. You know that dreamy under-cabinet glow that makes every kitchen look like a Pinterest dream? Yeah, I wanted that. But I didn’t want to pay someone hundreds of dollars to hardwire tiny lights under my cabinets. No, thank you.

    So I did what any self-respecting Amazon addict does—I went searching for a DIY-friendly solution and found these gems:

    📦 Under Cabinet Lights – 40 LED, Rechargeable, Motion Sensor, Magnetic, Dimmable (2-Pack): https://amzn.to/4kAkOuH [affiliate link]

    ✨ Why I Love Them

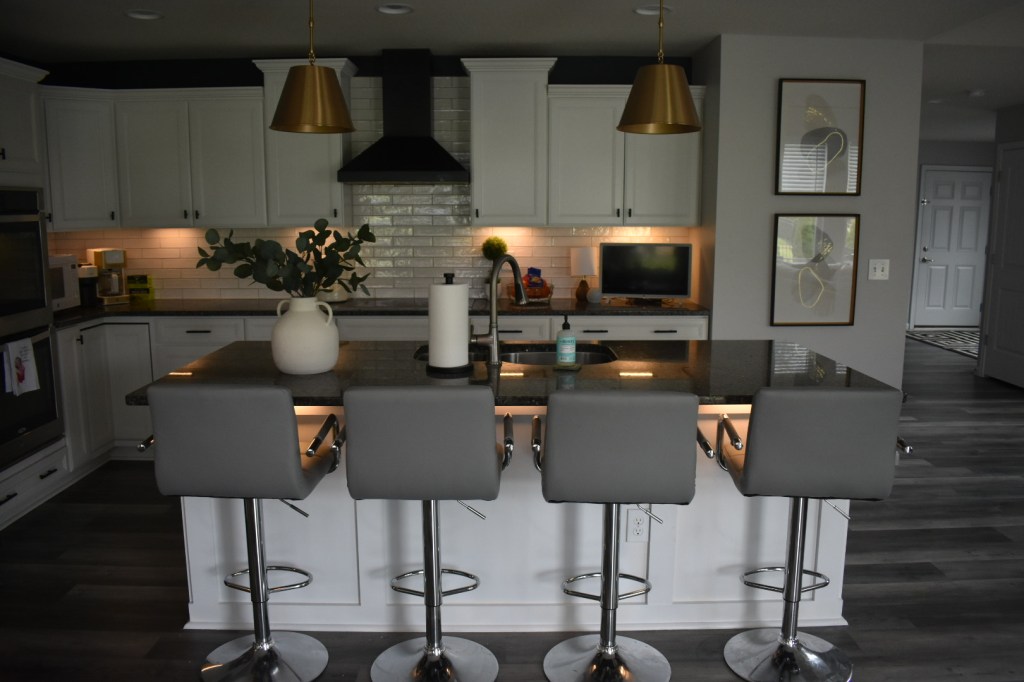
    First of all, these lights come in either warm light or white light—I went with warm light because I’m all about that cozy, inviting kitchen vibe.

    They’re magnetic, super easy to install (no tools, no sweat), and they have two main settings:

    • Auto (motion sensor—my fave)
    • On (constant light—perfect for dinner parties or a cozy evening vibe)

    💡 Creative Ways to Use Wireless LED Lights Around Your Home

    One of my favorite things I did was place them under my kitchen island, right in front of the bar stools. When my daughter or her friends sit down, the lights magically flick on like it’s their own little spotlight moment. It’s subtle, but such a fun touch—and yes, it makes me ridiculously happy every time.

    Stick-on motion lights installed under the island bar for added glow and charm
    Stick-on motion lights installed under the island bar for added glow and charm.

    I also put one in my kitchen pantry, and honestly? That was a genius move.

    No need to flick on the overhead light just to grab a snack (especially those late-night sneak-ins). It puts off just enough light, and weirdly, that one seems to have an endless charge. I barely remember recharging it.

    Rechargeable pantry lighting that turns on when you walk in—perfect for late-night snacks.

    Bonus use? I got creative and mounted one above a piece of artwork in a shadow box. Oh. My. Gosh. I get sooooooo many compliments on this. People do a double-take wondering if I had some fancy sconce installed. Nope—it’s just my little rechargeable wonder doing the most.

    Budget lighting hack: placing a rechargeable light above framed art for gallery vibes
    Budget lighting hack: placing a rechargeable light above framed art for gallery vibes.

    Am I regularly rotating this one out to charge? Yep.
    Am I still thrilled I did it? Absolutely.

    If you’ve ever wanted to spotlight your art but didn’t want to shell out for hard-wired lighting, this is a seriously budget-friendly way to make your space look elevated.

    🔋 The Only Drawback?

    They’re rechargeable. So yeah, you’ll need to plug them in every so often. But I’ve got a little system going—I just rotate them out one at a time, like a lighting carousel. Is it ideal? Nope. Is it the end of the world? Also nope.

    For the price (seriously affordable), the vibe they give off, and the satisfaction of not having to call an electrician—I’ll take it.

    Final Thoughts: Are These Rechargeable Lights Worth It?

    Affordable LED cabinet lighting that instantly elevates any kitchen design
    Affordable LED cabinet lighting that instantly elevates any kitchen design.

    If you’re on a budget but still want your kitchen (or pantry, or artwork wall!) to feel a little more elevated, these lights might be your new best friend. They’re low-commitment, easy to use, and they bring a surprising amount of joy.

    And really, isn’t that what we’re all looking for in a home upgrade?

    Have creative uses for these lights? Share your ideas in the comments! And if you try this hack—tag me on Instagram or TikTok, I’d love to see it!

    Cheers! – Liz

  • Nutsedge weed growing among new grass seedlings in a lawn patch
    Nutsedge weed growing among new grass seedlings in a lawn patch

    Grass or weed? How to tell if it’s nutsedge

    So here’s a funny (and slightly painful) little story from my lawn adventures: I recently decided to patch a bare spot in my yard. You know the drill—loosen the soil, toss some grass seed, add a little fertilizer, peat moss on top, water it lovingly like it’s your new plant baby. Everything seemed to be going great…

    Until this one little patch of grass started growing really fast. Like, suspiciously fast. Greener, taller, just totally outpacing the rest. And silly me—I thought, “Wow, did I accidentally invent some kind of super grass?”

    Spoiler alert: I did not.

    As I was filming a video about patching a bare spot in the lawn, I thought – hmmmmmm …. better see what this “super grass” actually is, so I don’t look like a TOTAL idiot on my new YouTube channel. So, out of curiosity, I opened my beloved plant identifier app to see what this mystery green miracle was. And there it was in black and white: nutsedge. Though the app interestingly said “this plant looks HEALTHY!” (healthy!) – it was nonetheless …. drumroll please ….. A weed.

    A clever, annoying, triangle-stemmed weed.

    Nutsedge vs grass – how to tell the difference

    If you’re new to identifying nutsedge, here’s a quick rundown:

    • It grows faster than your grass.
    • It looks shiny and bright green.
    • It has a triangular stem if you roll it between your fingers.
    • It shoots straight up like it’s trying to win a race.
    • And it’s super persistent.

    Honestly, it blended in with my baby grass at first. I only caught it because it was growing so much taller and faster than everything else. That’s when I got suspicious.

    What I Think I Did Wrong

    Now, I’m not a pro (obviously, given the “super grass” moment), but here are a few things I suspect invited the nutsedge party:

    • The soil wasn’t deep enough in that spot.
    • The area had poor drainage—nutsedge loves wet soil.
    • I over watered like a helicopter plant parent.
    • And… I may have applied the fertilizer before the peat moss. Whoops?

    So yeah, this bare spot fill-in project quickly became a lesson in weed identification instead of a celebration of lush new grass. Classic.

    What I Did About It

    Pulled nutsedge with visible roots and triangular stems
    Pulled nutsedge with visible roots and triangular stems.

    Since it was a small area, I just pulled the nutsedge out by hand. Carefully. I tried to get the little nutlets (yep, that’s a real thing) underground so they don’t regrow immediately.

    And now? We wait. It’s a bit of an experiment. The next time I patch a bare spot, I’m going to:
    ✔️ Make sure the soil is deeper
    ✔️ Work on better drainage
    ✔️ Chill out with the watering
    ✔️ Maybe double-check the order of my steps

    Hopefully, I’ll get grass this time—not a botanical prankster weed.

    Moral of the Story

    Sometimes your “super grass” turns out to be a sneaky weed. But hey, at least I know what nutsedge looks like now. If you’re seeing fast-growing, shiny green blades in your new lawn that look too healthy—grab a plant ID app and check. You might be hosting nutsedge, too.

    Sigh. It’s always something. But that’s the lawn life, right?


  • Pressure Washing – Oh so satisfying

    Hello world! I am a gal who finds herself looking around her house, eyeballing every little detail of home and yard, and thinking to myself — hmmmmm …. I wonder what I can try and improve next?

    And so begins my newfound love. The pressure washer.

    Do you get satisfaction out of vacuuming? Mowing the lawn? You know – those immediate gratification things?

    Well if pressure washing isn’t on your list, let me introduce you to my new little friend.

    Say hello to my little friend!

    Now I have never bought a pressure washer before and don’t have anything to compare it to. I just know this one worked for me.

    But who needs words, when you have video? Here are some snippets of this little baby at work.

    My little green friend in action! Like taking a water eraser to concrete!
    I can even write in cursive! DO NOT USE THIS PIN SETTING on your wood deck. It will take the paint right off!

    Pressure Washing Results – Before and After

    Here are some more before and after photos of the pressure washing I did to my basement concrete walkout steps. What I like is that you can turn the nozzle all the way to the left to get pin point precision for very hard spots. But that will take you forever! Turn the nozzle a little to the right for a fuller spray. I settled sort of in the middle.

    Yes, it took time. But good things come to patient people, right?

    Pressure Washer Review

    In case you guys haven’t realized by now, I review my pressure washer with high marks! This is the one I bought off of Amazon for a pretty good deal. I watched the videos on the product posting on Amazon to learn how to quickly set it up (I’m more of a visual learner).

    Here is link to where I purchased: Pressure Washer, 4200PSI 2.6 GPM Power Washer with Foam Cannon 23FT Hose PATOOLIO Electric High Pressure Washer for Fences, Patios, Decks, Patios and Cars Powerwasher

    (paid link) As an Amazon Associate I earn from qualifying purchases

    WORD TO THE WISE: Pressure washing can exert a lot of power! I was so tempted to spray off my dirty hands with it, as if it was a regular ol’ hose. DO NOT SPRAY ANYWHERE NEAR YOUR BODY PARTS WITH THIS!! It is seriously strong.

    I hope you enjoy pressure washing as much as I do friends!!! – Liz